How to Create a Template
This tutorial explains how to create a Alibaba Cloud EC2 template and use it to create a service of ECS instance(s) on Alibaba Cloud.
Prerequisites
- A GitHub Repository for storing the template.
- Walrus installed.
Create a repository on GitHub
- Create a new repository on GitHub of your own. Here we use the repository demo
- Clone the repository to your local machine.
git clone git@github.com:walrus-catalog-demo/demo.git
Create Template Files
- Go to the cloned repository directory.
cd demo
Create files in the directory as follows:
- demo
  - main.tf
  - outputs.tf
  - variables.tf
  - README.md
The main.tf file defines the resources to be created. Here we define resource for the template to create an Alibaba Cloud ECS instance.
resource "alicloud_instance" "example" {
  instance_name        = "demo-instance"
  instance_type        = var.instance_type
  image_id             = var.image_id
  system_disk_category = var.system_disk_category
  system_disk_size     = var.system_disk_size
  internet_charge_type = var.internet_charge_type
  internet_max_bandwidth_out = var.internet_max_bandwidth_out

  vswitch_id = data.alicloud_vswitches.default.vswitches.0.id

  host_name = var.hostname
  key_name = "seal-demo"

  security_groups = [
    data.alicloud_security_groups.default.groups.0.id
  ]
}

data "alicloud_vpcs" "default" {
  name_regex = "default"
}

data "alicloud_vswitches" "default" {
  vpc_id = data.alicloud_vpcs.default.vpcs.0.id
}

data "alicloud_security_groups" "default" {
  name_regex = "default"
}

resource "null_resource" "health_check" {
  depends_on = [
    alicloud_instance.example,
  ]
}
The variables.tf file defines the variables used in the template. Walrus will use the variables to generate the form for users to fill in.
Walrus use the @label and @group annotations to define the labels and groups of the variables. The optional @options annotation is used to define the dropdown options of the variable, if the @options annotation is not defined, the variable will be displayed as a text box in the form. More details about the annotations can be found here.
In this example, we define two groups: Basic and Advanced. It will be displayed as two tabs in the form when creating a service using this template.
# @label "Instance type"
# @group "Basic"
variable "instance_type" {
  description = "The instance type of the ECS instance"
  default     = "ecs.s6-c1m2.small"
}

# @label "VM image id"
# @group "Basic"
variable "image_id" {
  description = "The ID of the image used to launch the ECS instance"
  default     = "ubuntu_18_04_x64_20G_alibase_20230208.vhd"
}

# @label "System disk type"
# @group "Basic"
# @options ["ephemeral_ssd", "cloud_efficiency", "cloud_ssd", "cloud_essd", "cloud", "cloud_auto"]
variable "system_disk_category" {
  description = "The category of the system disk"
  default     = "cloud_efficiency"
}

# @label "System disk size"
# @group "Basic"
variable "system_disk_size" {
  description = "The size of the system disk, value range: [20, 500]"
  default     = 40
}

# @label "Hostname"
# @group "Basic"
variable "hostname" {
  type        = string
  description = "The hostname of the ECS instance"
  default     = ""
}

# @label "Network billing type"
# @group "Advanced"
# @options ["PayByTraffic", "PayByBandwidth"]
variable "internet_charge_type" {
  description = "The billing method of the public network bandwidth"
  default     = "PayByTraffic"
}

# @label "Max outbound bandwidth (MB)"
# @group "Advanced"
variable "internet_max_bandwidth_out" {
  description = "The maximum outbound bandwidth of the public network"
  default     = 5
}
The outputs.tf file defines the outputs of the template which will be displayed to the user after the service is created. The outputs of the template of a service could also be referenced by other services.
output "public_ip" {
  value = alicloud_instance.example.public_ip
}

output "primary_ip_address" {
  value = alicloud_instance.example.primary_ip_address
}
The README.md file is the description of the template. It will be displayed to the user when creating a service using this template. Here we can use the tool terraform-docs to generate the description of the template.
terraform-docs markdown . > README.md
The generated README.md file is as follows:
## Requirements

No requirements.

## Providers

| Name | Version |
|------|---------|
| <a name="provider_alicloud"></a> [alicloud](#provider\_alicloud) | n/a |
| <a name="provider_null"></a> [null](#provider\_null) | n/a |

## Modules

No modules.

## Resources

| Name | Type |
|------|------|
| [alicloud_instance.example](https://registry.terraform.io/providers/hashicorp/alicloud/latest/docs/resources/instance) | resource |
| [null_resource.health_check](https://registry.terraform.io/providers/hashicorp/null/latest/docs/resources/resource) | resource |
| [alicloud_security_groups.default](https://registry.terraform.io/providers/hashicorp/alicloud/latest/docs/data-sources/security_groups) | data source |
| [alicloud_vpcs.default](https://registry.terraform.io/providers/hashicorp/alicloud/latest/docs/data-sources/vpcs) | data source |
| [alicloud_vswitches.default](https://registry.terraform.io/providers/hashicorp/alicloud/latest/docs/data-sources/vswitches) | data source |

## Inputs

| Name | Description | Type | Default | Required |
|------|-------------|------|---------|:--------:|
| <a name="input_hostname"></a> [hostname](#input\_hostname) | The hostname of the ECS instance | `string` | `""` | no |
| <a name="input_image_id"></a> [image\_id](#input\_image\_id) | The ID of the image used to launch the ECS instance | `string` | `"ubuntu_18_04_x64_20G_alibase_20230208.vhd"` | no |
| <a name="input_instance_type"></a> [instance\_type](#input\_instance\_type) | The instance type of the ECS instance | `string` | `"ecs.s6-c1m2.small"` | no |
| <a name="input_internet_charge_type"></a> [internet\_charge\_type](#input\_internet\_charge\_type) | The billing method of the public network bandwidth | `string` | `"PayByTraffic"` | no |
| <a name="input_internet_max_bandwidth_out"></a> [internet\_max\_bandwidth\_out](#input\_internet\_max\_bandwidth\_out) | The maximum outbound bandwidth of the public network | `number` | `5` | no |
| <a name="input_system_disk_category"></a> [system\_disk\_category](#input\_system\_disk\_category) | The category of the system disk | `string` | `"cloud_efficiency"` | no |
| <a name="input_system_disk_size"></a> [system\_disk\_size](#input\_system\_disk\_size) | The size of the system disk, value range: [20, 500] | `number` | `40` | no |

## Outputs

| Name | Description |
|------|-------------|
| <a name="output_primary_ip_address"></a> [primary\_ip\_address](#output\_primary\_ip\_address) | n/a |
| <a name="output_public_ip"></a> [public\_ip](#output\_public\_ip) | n/a |
Commit and Tag Version
git add .
git commit -m "add template files"
git push -u origin main
Create a tag for the template version.
git tag v0.0.1
git push --tags
Create a Template on Walrus
- Open Walrus in your browser and log in.
- Go to the
Templatetab underOperations Huband create a template by using the template we just created, here we name the templatealiyun-ec2.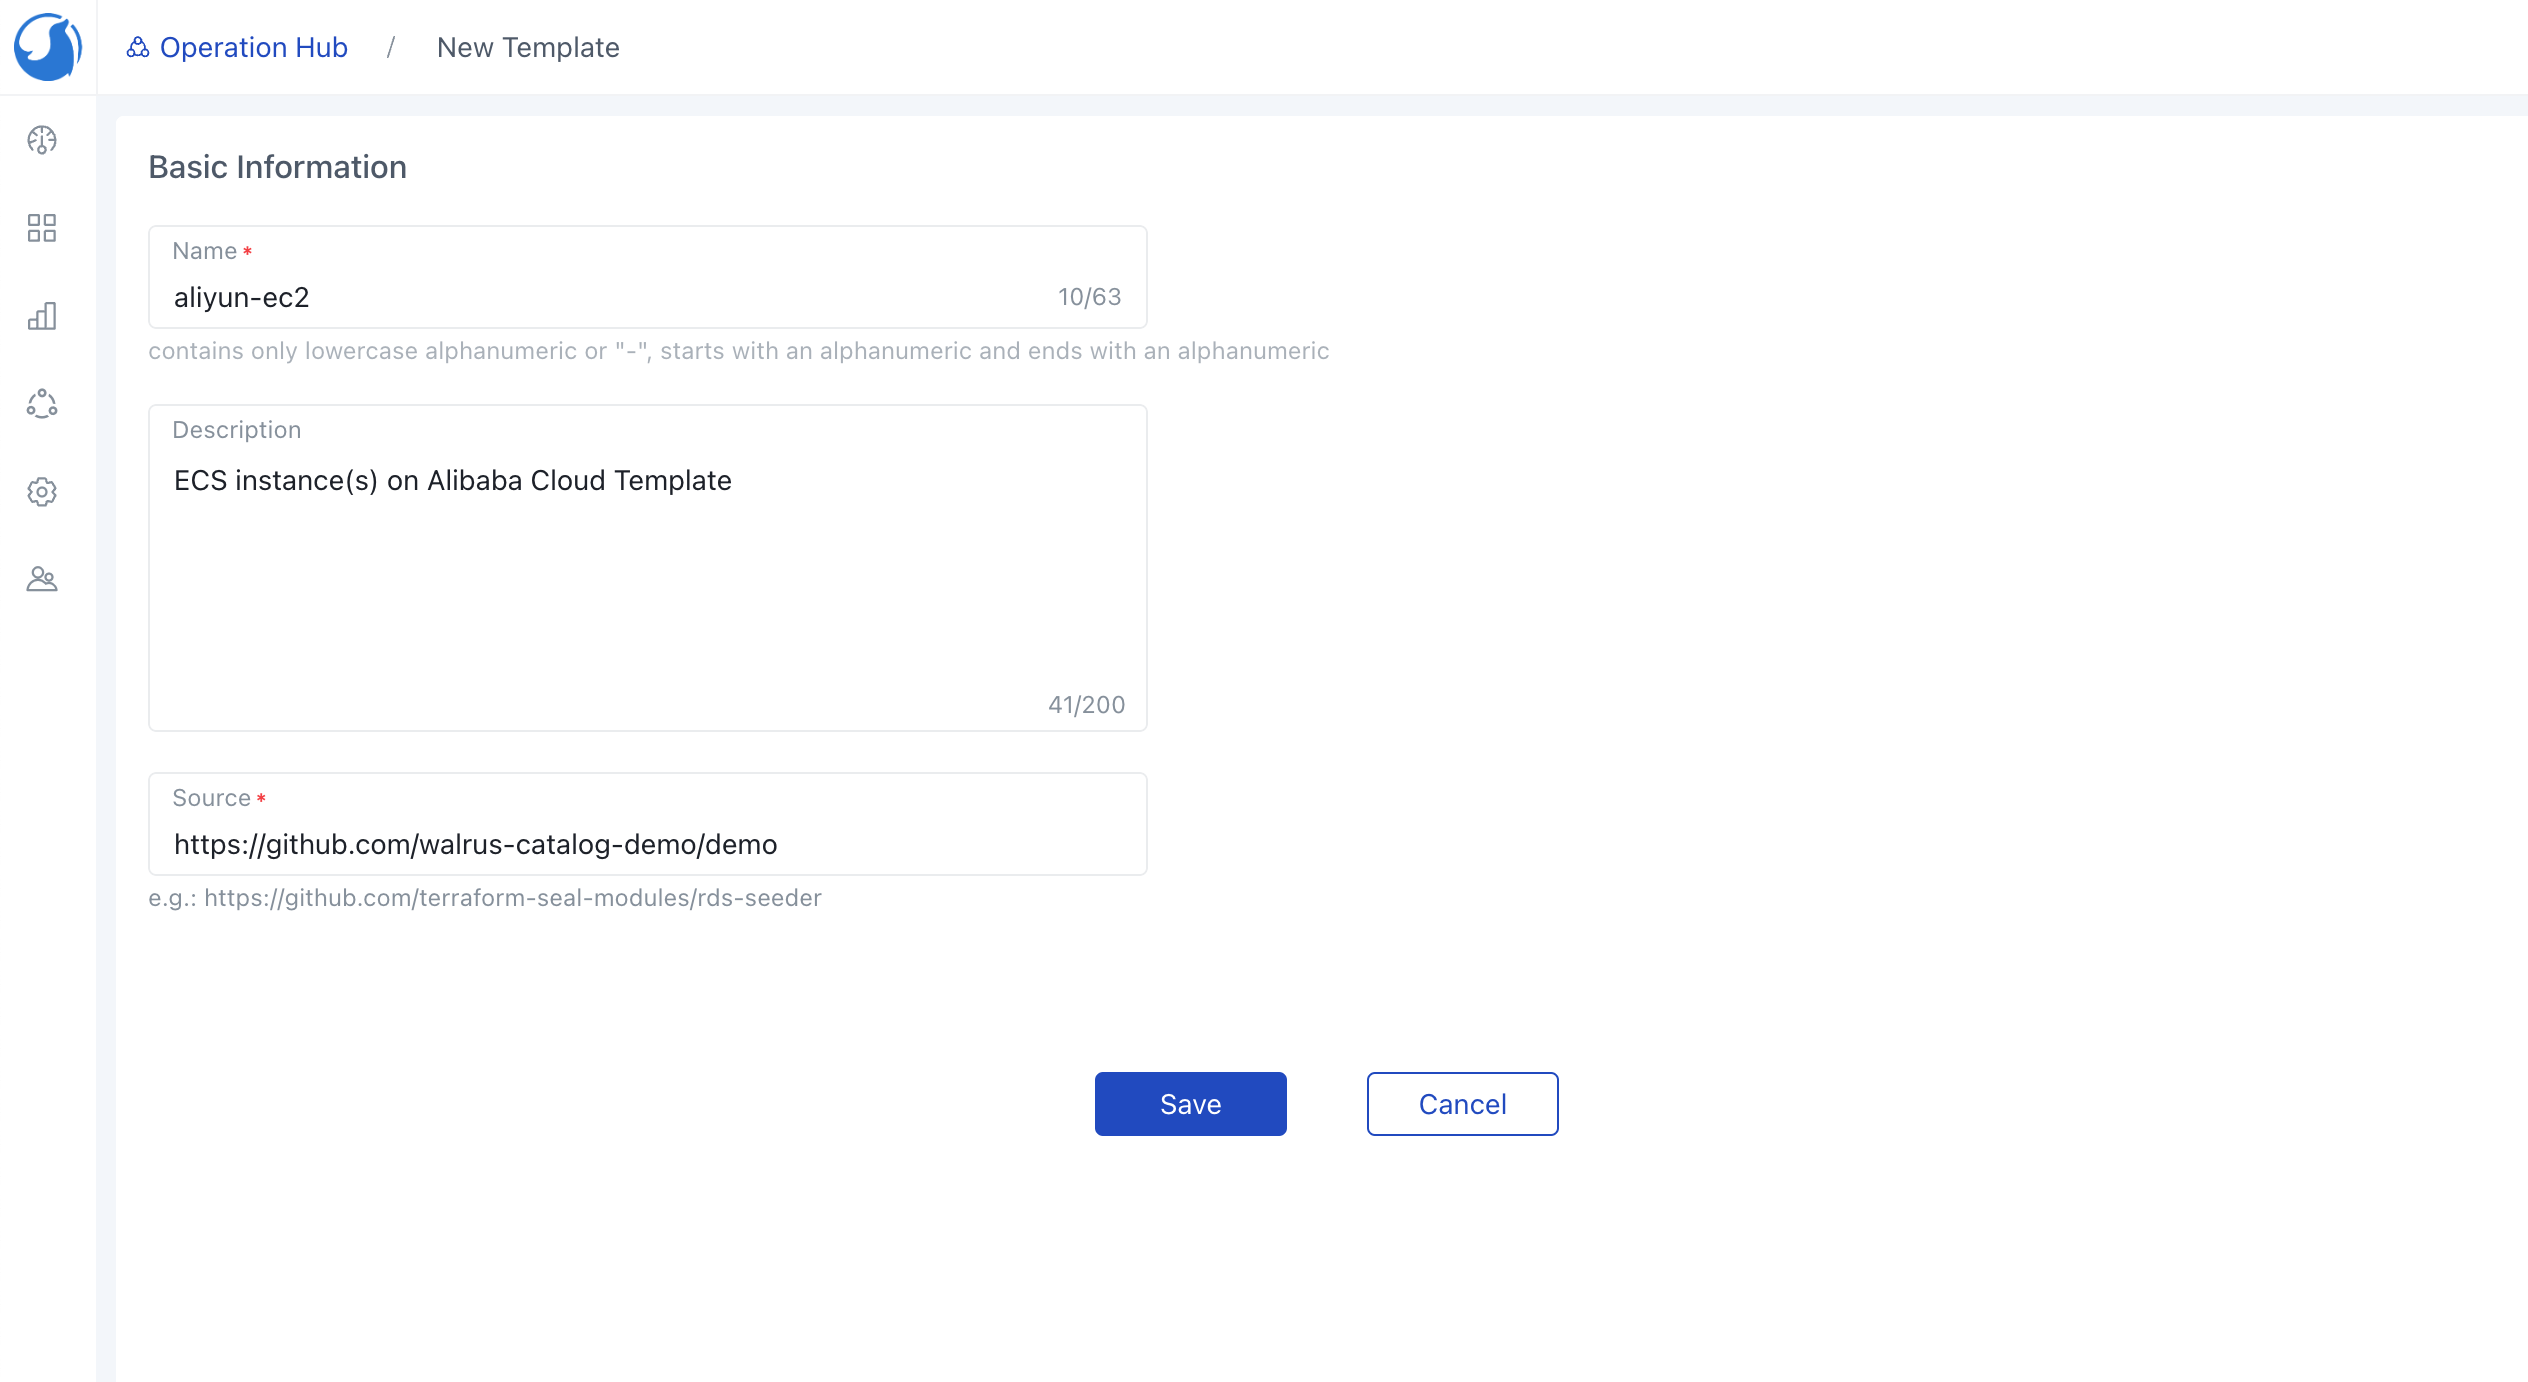 After the import task is completed, the template will be displayed in the template list, we can see the template version is
 v0.0.1.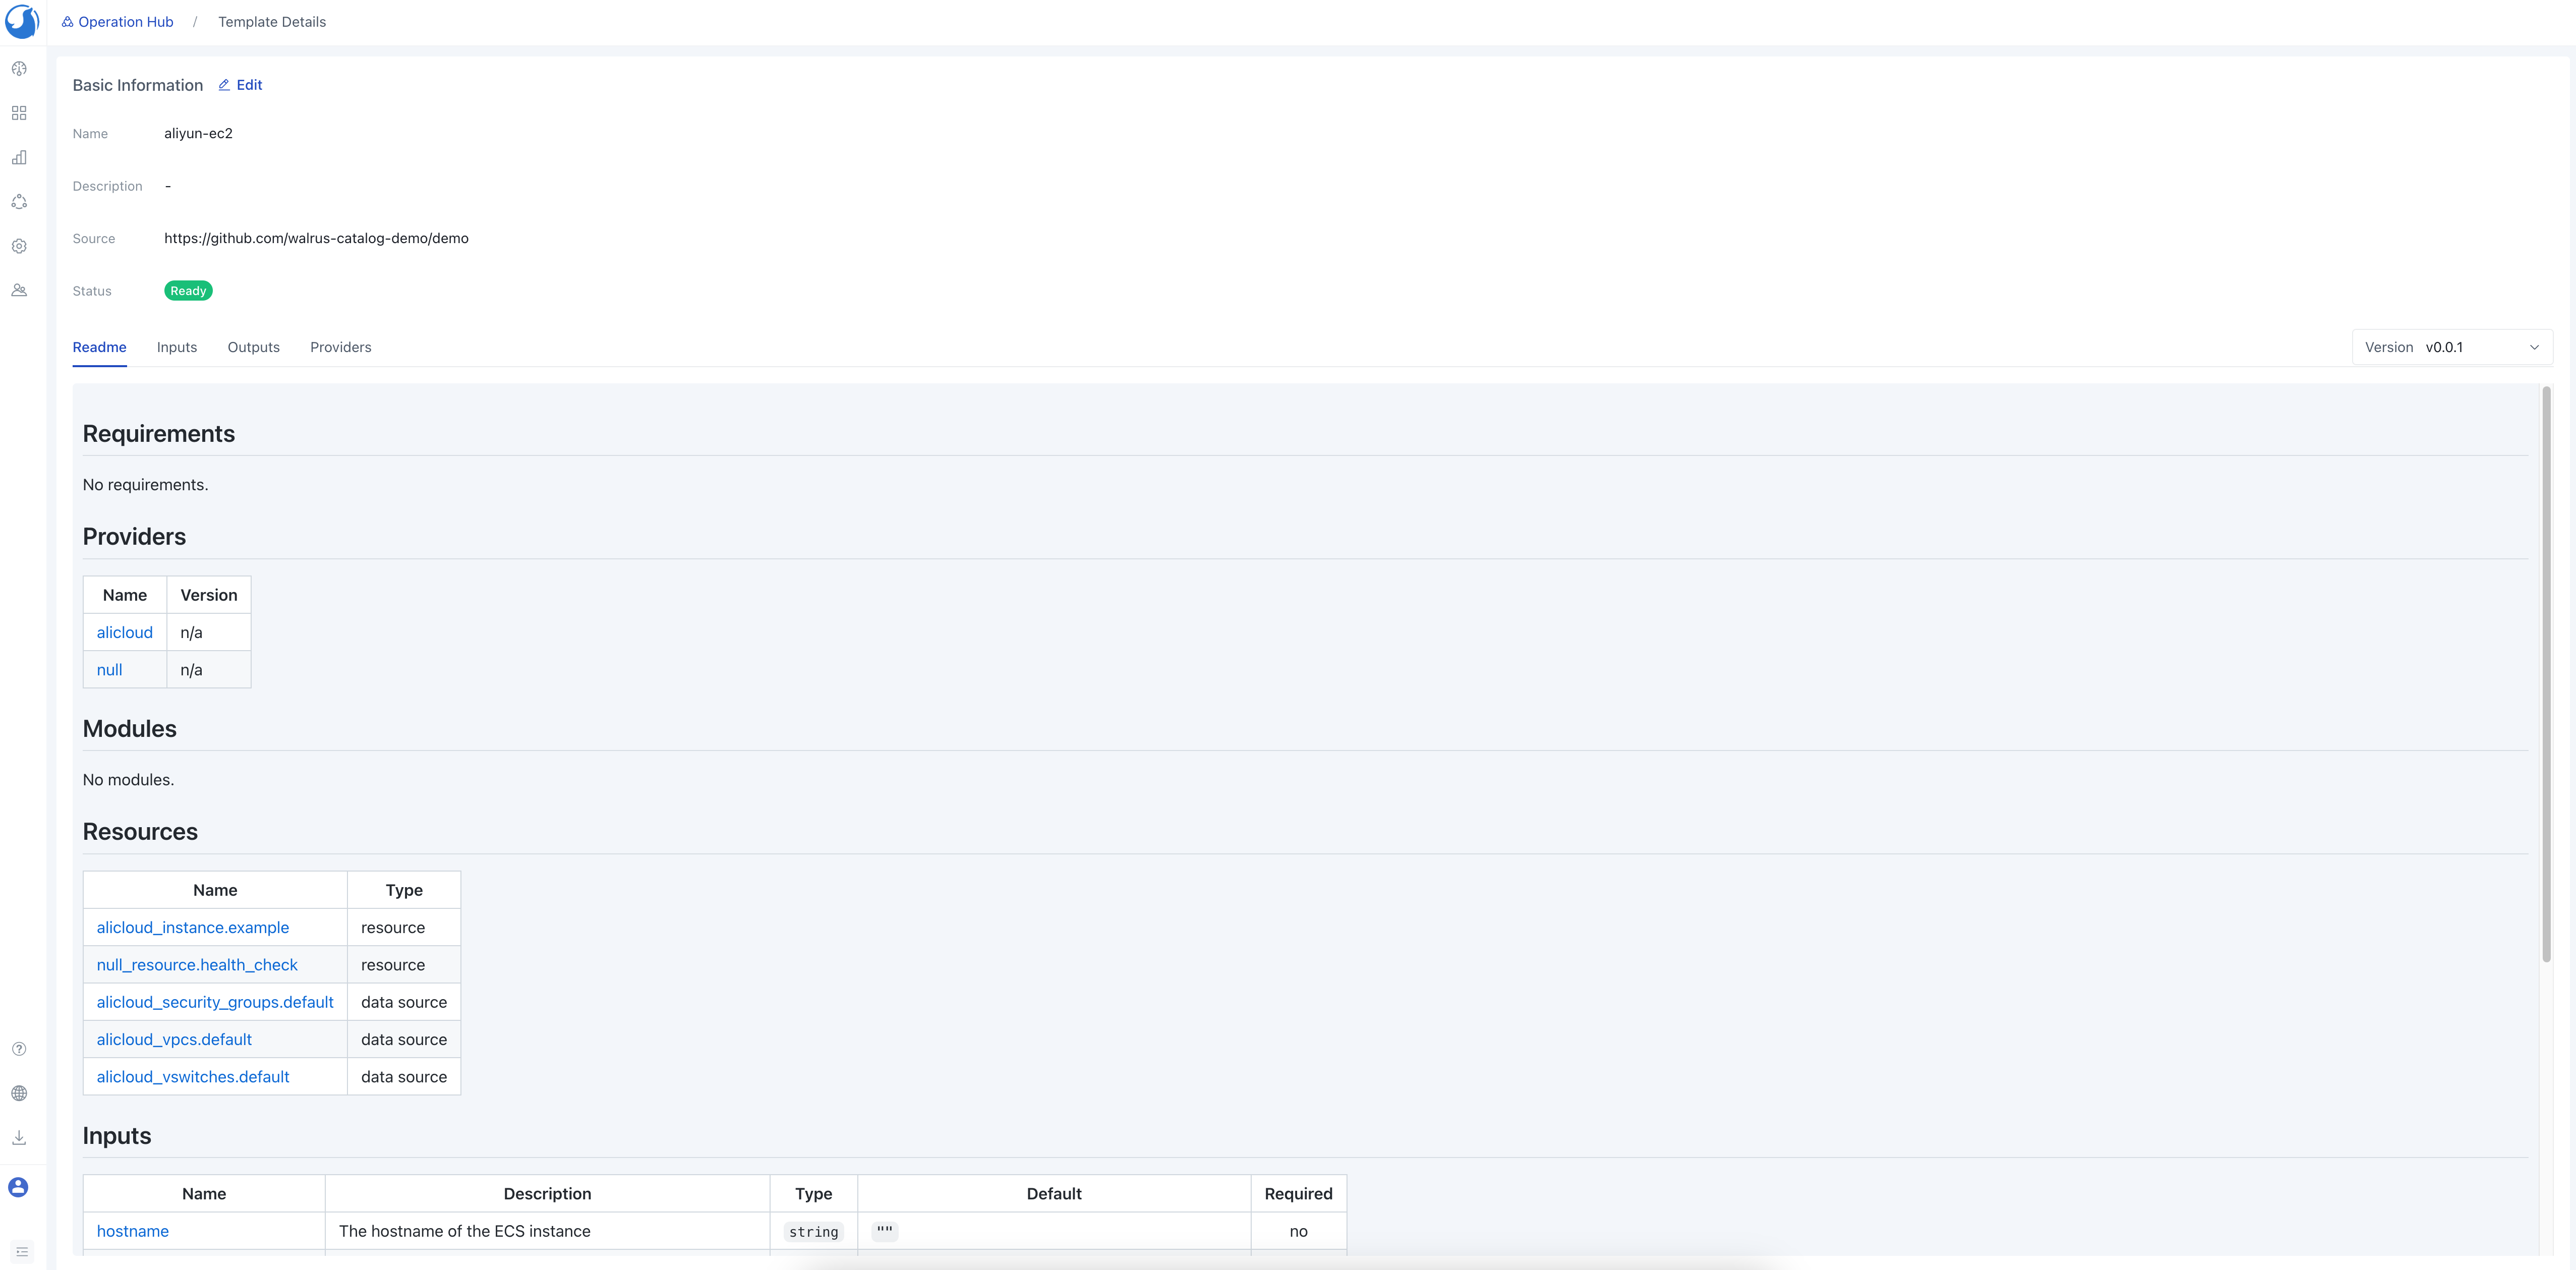
- Add Alibaba Cloud Provider in the
Connectorstab underOperations Hub. - Add Connector to the Environment.
- Create a Service using the template
aliyun-ec2, the form group and labels are generated according to the annotations in the template variables we defined.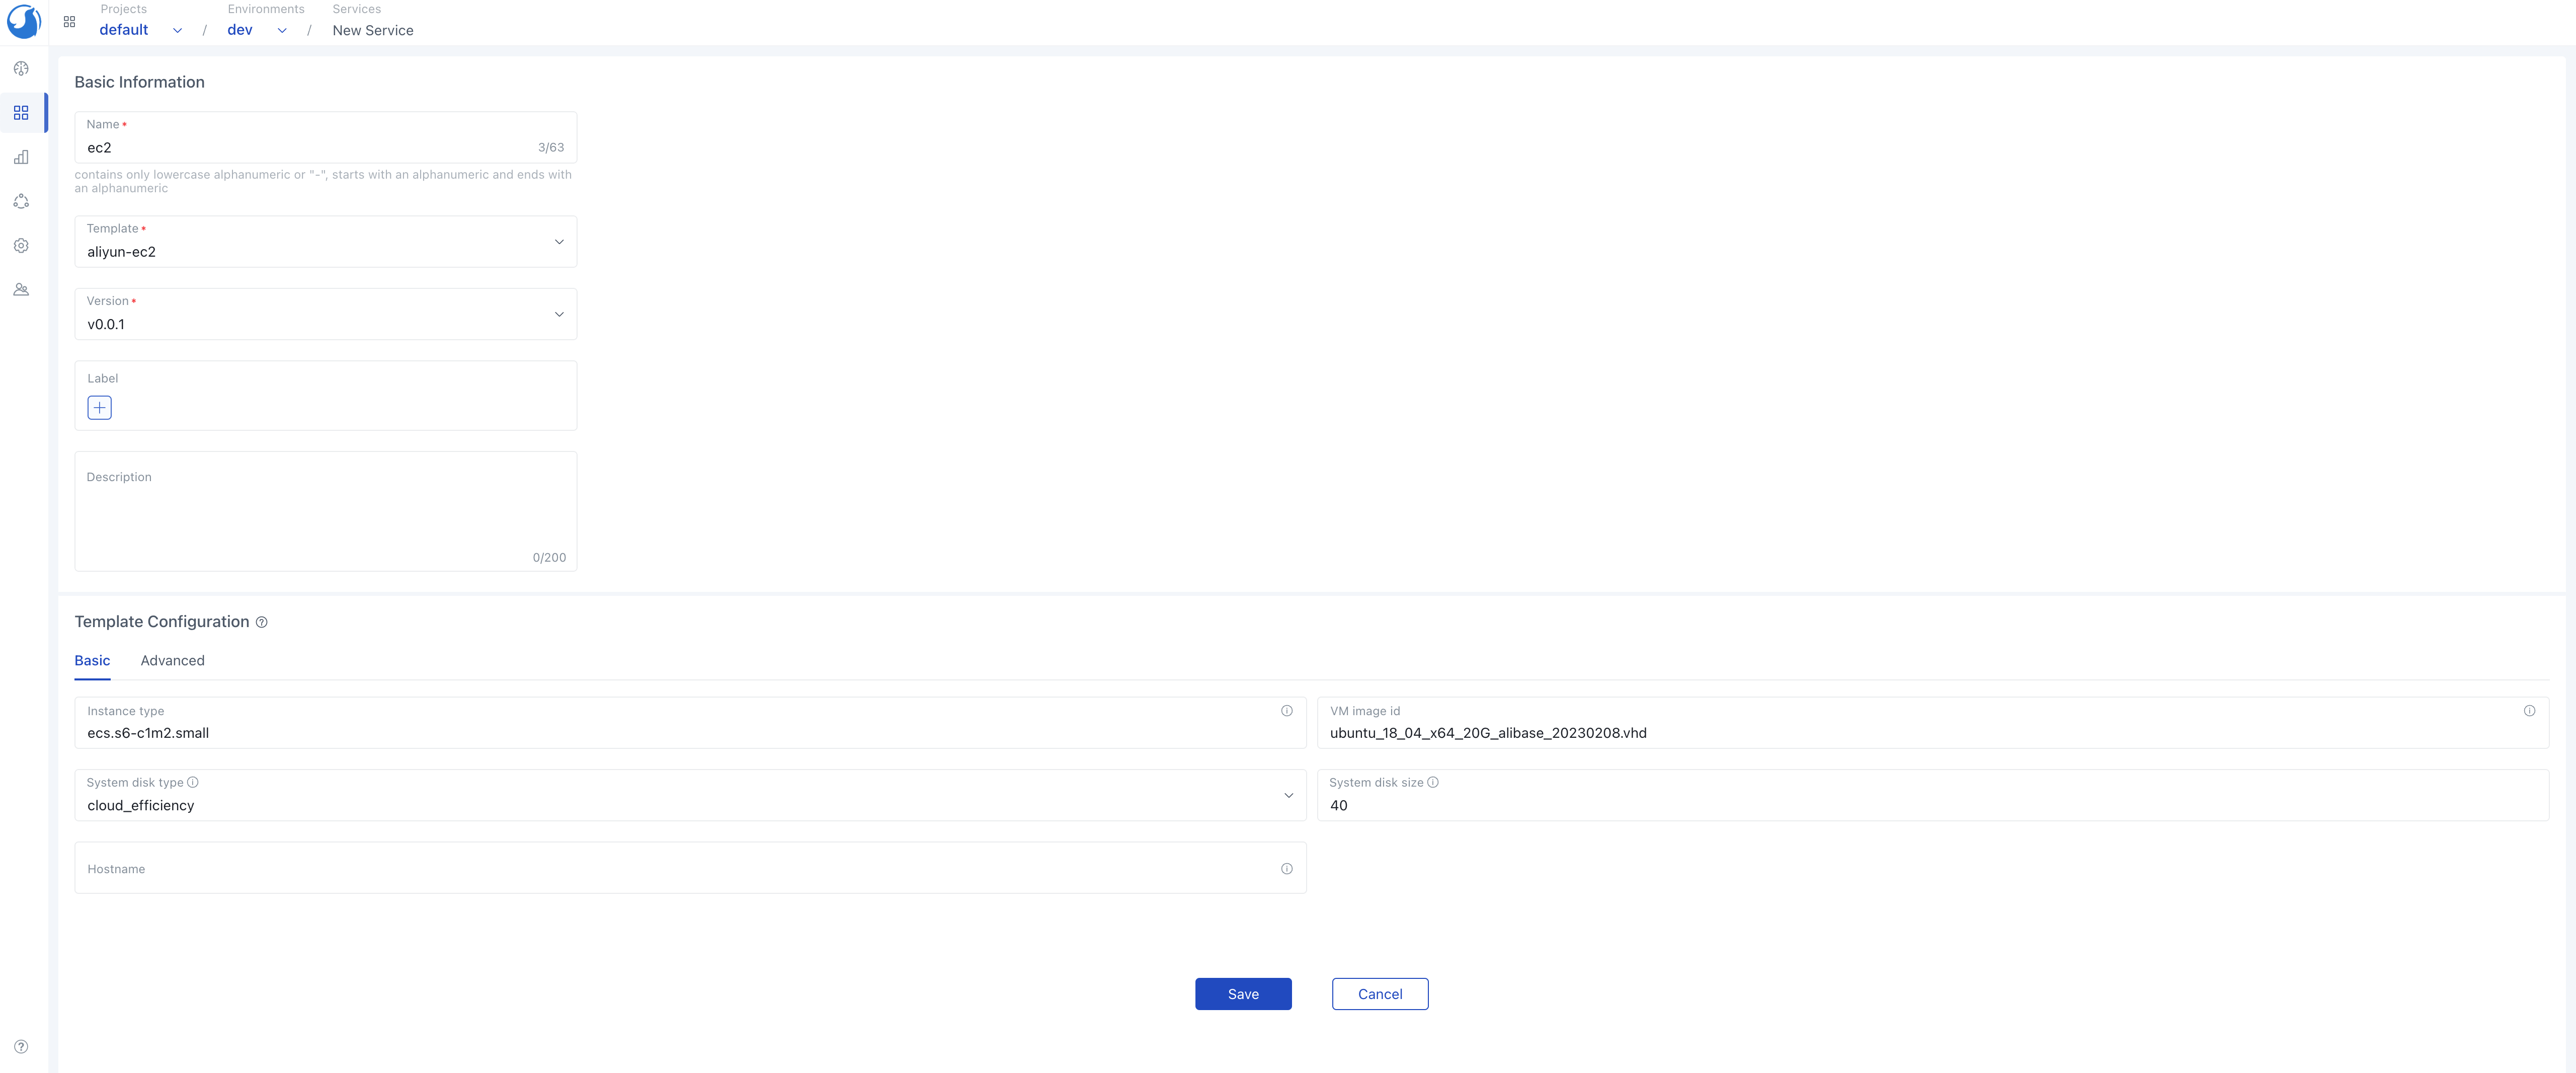
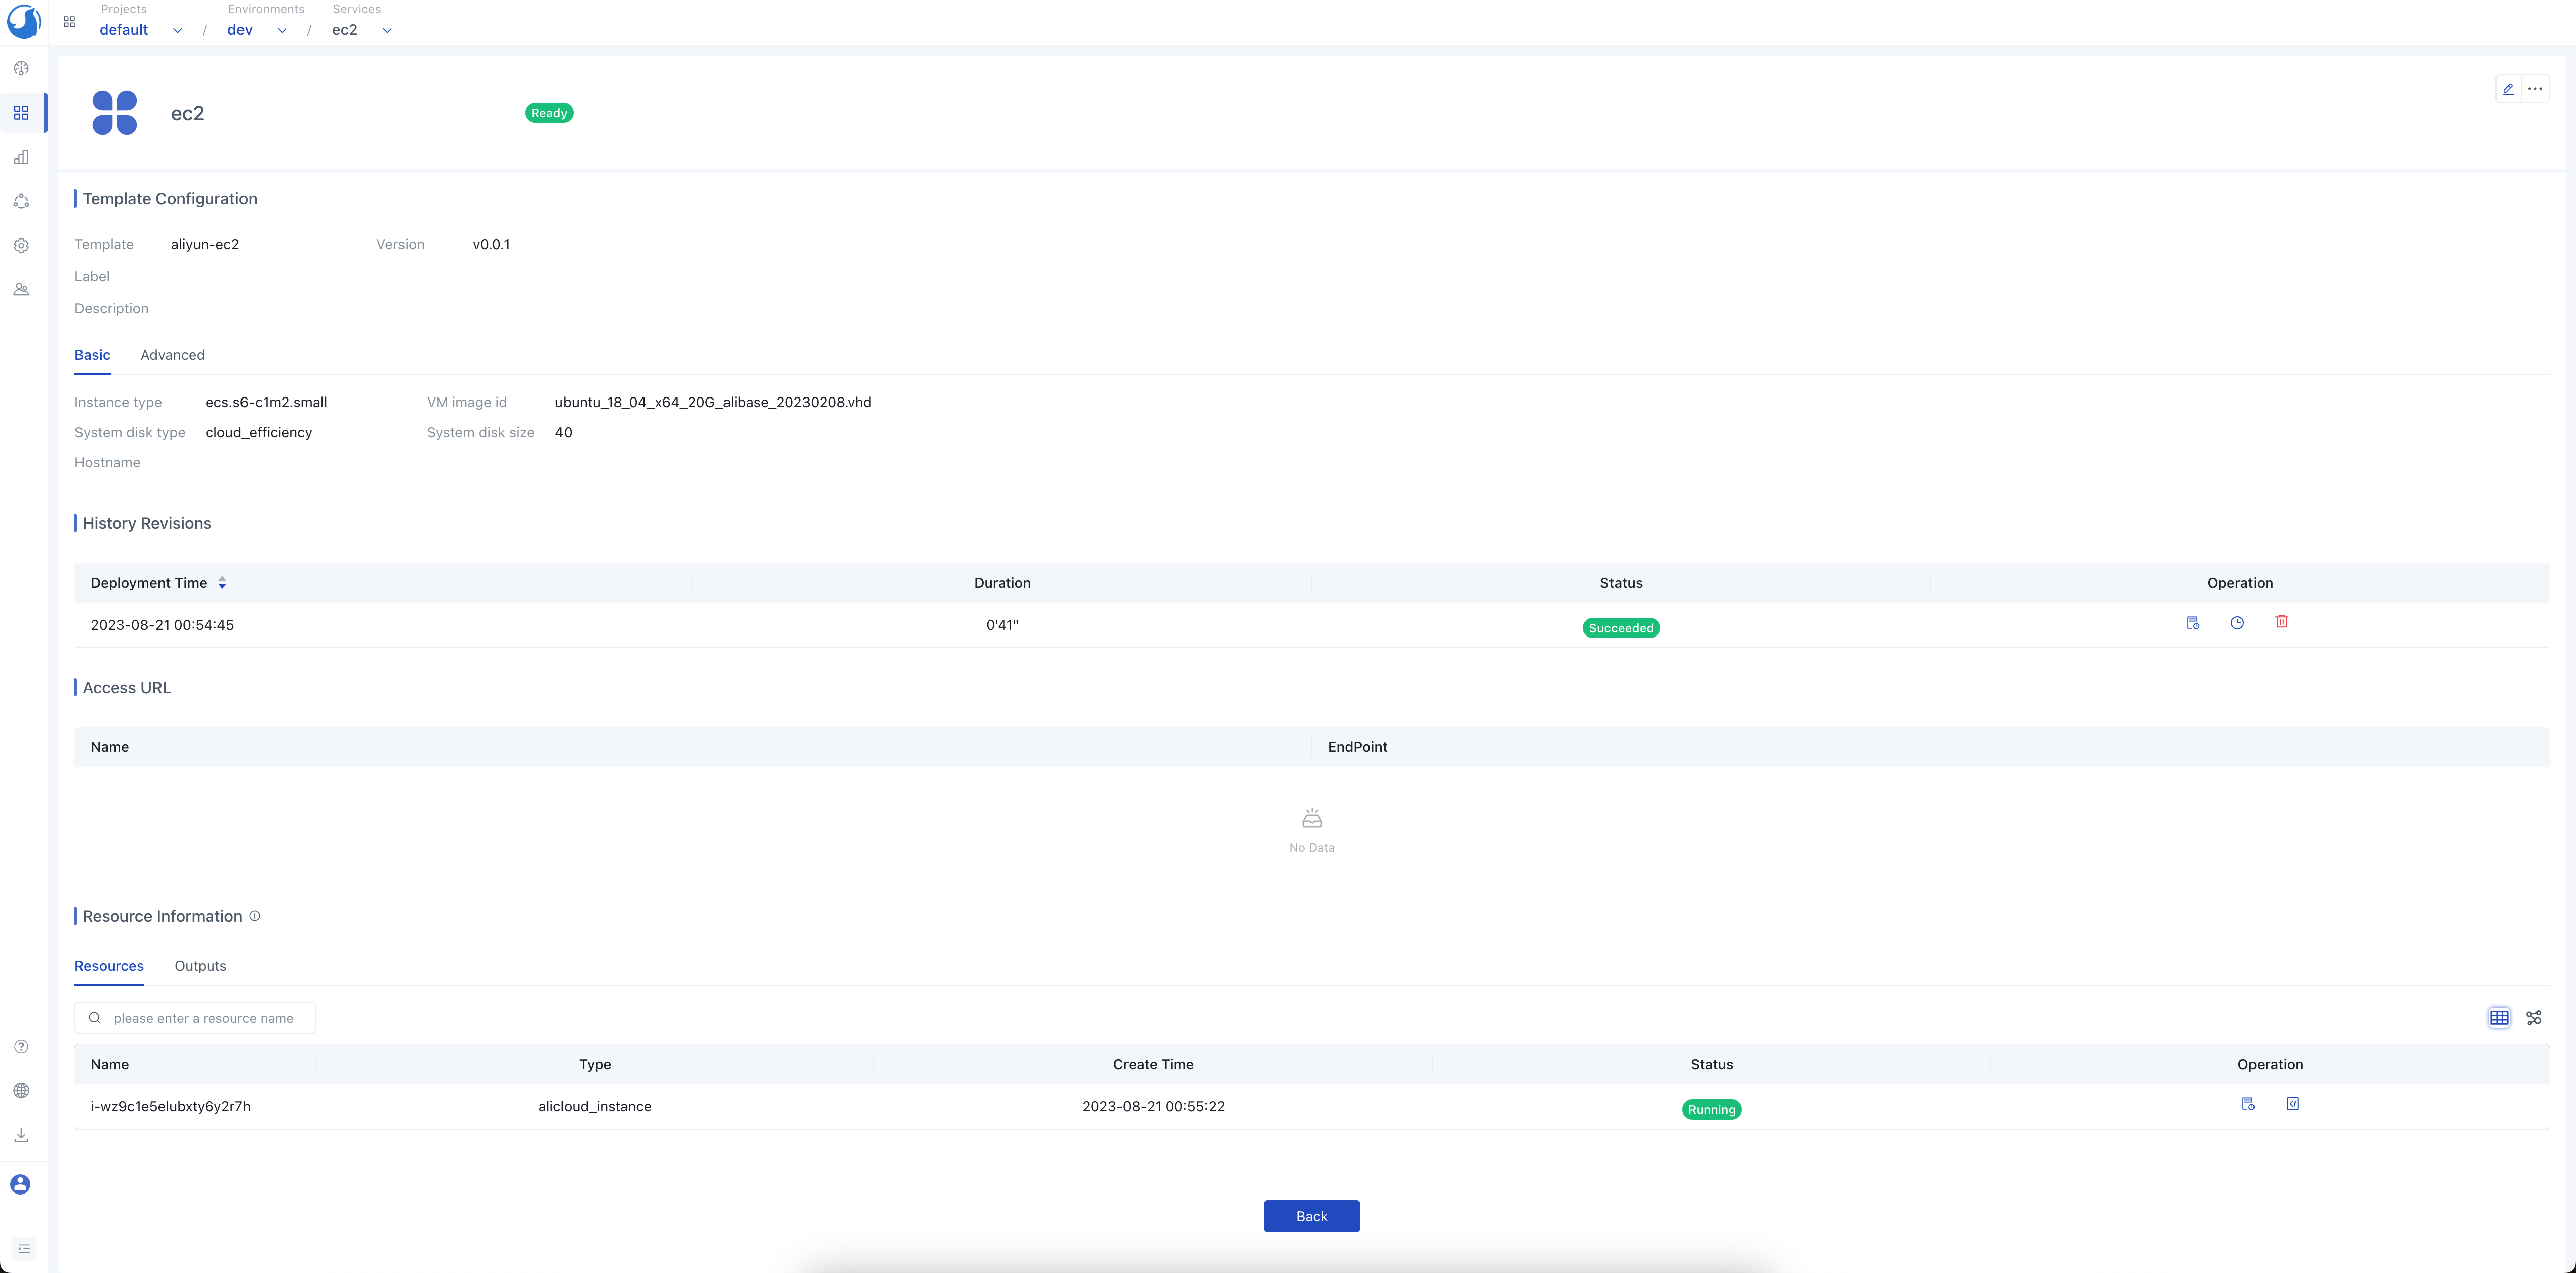
After the service is created, we can see the details of the service and the outputs of the template.
 Check the ECS instance on Alibaba Cloud console, we can see the ECS instance is created successfully.
